
INSTALLATION PROCESS
To set up this template you will need to have an account on Notion and a paid account with Super.so
On Notion
- Duplicate Catch Notion page HERE
- Then, at the top right of the Notion page click Duplicate
- If prompted, log in to Notion and choose a workspace
- Then you should see it appear in your Notion Sidebar

Once you’ve got the template in your own Notion workspace you need to get the Notion Share URL so Super can transform it into a website.
- Open the page you just duplicated in Notion
- On the top right corner press Share > Toggle the Public button > Copy web link
On Super
- Create a new site and name it
- Paste the link on the Notion Page URL section then press Continue.
you will find the design doesn't look the same as the template - don’t freak out, you haven't done anything wrong. Paste the code snippet underneath in the Site Settings > Code > Head Then press ‘Save’
<link href="https://evenbloom.github.io/catch-podcast/style/main.css" rel="stylesheet"/>Refresh the page and you’ll see your brand-new site!
If you do get stuck, there is a YouTube video on how to setup templates over HERE
Most sections of the Catch Homepage are inside Callouts.
Each Callout has a specific function based on its background color. Orange Callouts are for logos (partners, sponsors, and subscribing ) while Gray Callouts are for creating full-width sections, like those in the About and Hero sections of the Homepage.
If you like how the current template is structured, simply substitute the content with your own.
USING CALLOUTS
Using the full-width callouts will only show up on the homepage as demonstrated in the Hero section and the About section. Adding it on any other page will look like this ↓


Gray Callouts
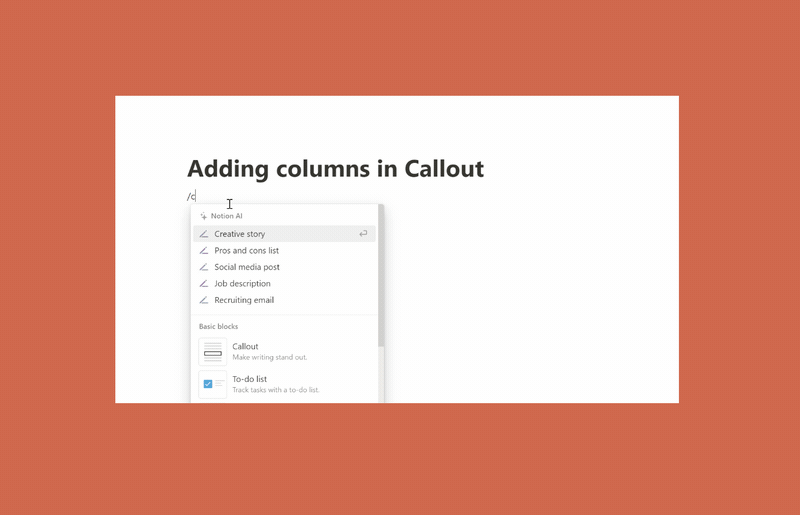
To add a callout like the above, you can follow these steps:
- Type “/callout” and select “Callout” from the options.
- A new callout block will be added to your page.
- Change the background color to Gray Background by clicking on the 6 dotted tab on the top left as demonstrated ↓
Orange Callouts
They are specifically for logos to be centered on your page
- Choose the logos of the podcast platforms where your podcast is available
- Create (max 4 columns) inside a callout with an Orange Background
That will center all your logos on your Homepage.


To make the logos link to a page
- Hover over the image and click on the “Caption” button.
- Add the URL you want to link to.
That’s it! Your image when clicked should guide you to where your podcast is located.
Green Callouts
There is a table view inside a Callout with a Green Background where you can add the listeners’ details and reviews.


USING TABLES
Using the table view database to add all the podcasts host information
- Update your profile picture.
- Include a link to your preferred socials.
- Write a bio to introduce yourself as the podcast host.
- Choose "Hosts" from the dropdown menu in the "Select" section.
**This database has a filter where the person with Host in the Select section can appear on the Homepage*


Table View for Host and Guest Information in Episode Pages
Here's how you can use a table view to show who is the host and the guest of an episode.
- In the episode page, Type and select “/linked view in database” > select “Hosted by” from the list of databases.
- Remove any existing filters on the database by clicking the “Filter” button and then clicking “Delete Filter”.
- Add the guests’ information (e.g., Profile pic, Name, Twitter handle, and Bio). Under select, you can choose between (Host or Guest). under selected hosts and guests, you choose properties (e.g, Host1, Host2, Guest 1, etc.) This is for a scenario where the database is full of guest's names and you want to specify which guest gets shown on which episode, as well as if only one host is interviewing a guest
- as demonstrated in the Gif below, click “selected hosts and guests”, then select “Filter”.
- Choose the corresponding host and guest for the episode from the dropdown menu.
That’s it! Now you have a table view on your episode page that shows the host and guest information for that episode. You can add additional properties to the database and customize the view to suit your needs.
Inside each Episode page
Embed your podcast from Spotify / Google podcast / etc, to your episode page. Add a comprehensive body of text describing the context of the episode with images relating to the subject. Add through the “Hosted by” database who your Host and Guest is.
QUESTIONS YOU MAY ASK
How do I add a new episode?
You can add as many episodes to the Recent episodes section by pressing “+New” and then filling in all the required properties. You can check out the episodes there already as a guide/reference to compare or copy.
Tick on ‘Feature’ if you want it to show up on the Home page / Front page.


How to add buttons and links?
For Buttons
To add the button style to your content you need to do as follows:
Write the title you want to add to the button > highlight the text and link it to a URL of your choice > then make it Bold (B).
For Links
Type the text of your choice and add an arrow (→) > highlight it and add a link
Navbar - “Get this template” Button
on Super you can link that button by doing as follows:
Navbar > Call to Action > Select URL > Add title and link

How to Change to a Dark or Light Theme?
On Super navigate to Design > Colors > Under “Default color mode” you can choose Light or Dark
How to Enable or Disable the Theme toggle from the navbar?
On Super navigate to Options > Under “Theme toggle” you can choose to Enable or Disable.
How to Disable Page properties?
By default, sites now have ‘page properties’ enabled by default for database pages. To disable find Options on Super’s toolbar on the left hand side > under Page properties make sure it's 'Disabled'.
Have any questions?
Send your feedback or queries to hello@evenbloom.com